Journaling Reads:
One cold day in December, Jeff came into the family room wearing a sweatshirt and sweatpants, and the following conversation ensued...
Aly: Those sweats look comfy and warm.
Jeff: Yeah, they make me sweat and stink and that’s the best part.
Aly: They make you stink? You like to stink?
Jeff: Yeah!! Boys are supposed to stink.
...later that day...
Aly: Something stinks! Who stinks?
Jeff: (with a huge grin on his face): Me!! I stink!! I’m like the dinosaurs cause they’re stinct.
Credits: All Digital Scrapbook Memories products from the new CD, Oh Boy!
Thursday, January 31, 2008
Stinky 6 year-old

Built Kid Tough

Journaling reads:
Jeff and Megan went to Lowe’s on Saturday, December 16th to learn how to build pine wood derby cars. Lowe’s gave them little aprons and eye goggles. They could not wait to wear their new gear while helping Papa with some of his work on the house.
Credits: All Digital Scrapbook Memories products from the new CD, Oh Boy!
Big Boy Toys

Journaling Reads:
Jeff loves all things that have to do with trucks; especially big trucks. Since he was able to talk, he has learned the names of different trucks and heavy machines, and he will correct you if you call one by the wrong name. You can imagine how delighted he was to come home one day to find a front-end loader and a dump truck making their way down the street. They were collecting yard trash for the annual yard clean-up day. He stood outside watching every thing. When they got to Papa’s house, the man driving the front-end-loader offered to let him ride in the cab. He was so excited and had a great time watching the loader pick up all the tree branches and other trash. What a great experience for a four year old boy!!
Credits: All Digital Scrapbook Memories products from the new CD, Oh Boy!
Playing Dirty

Journaling reads:
Jeff came to see Grandma and Papa right when they got home from a camping trip. Jenny said she would wash his face and hands and 5 minutes later he would be this dirty again, but He sure had fun playing in the dirt.
Credits: All Digital Scrapbook Memories products from the new CD, Oh Boy!
Sunday, January 27, 2008
Lots of new pages!!
I just added 12 pages that are either new, or I just had not uploaded yet. Anyway, you may have to click the 'older posts' link at the very bottom to see them all. (and for Katie) KaBang, KaBang!
Christmas Eve 2006
 Journaling reads:
Every year the whole family meets for Family Home Evening on Christmas Eve. It's been a Rasmussen tradition since my mom was a little girl. Weread the Christmas story from the Bibleand a whoever wantsto can preform a talent. This year we even got Ryan, Scott , and Eric to do their Jingle Bells routine. It was so funny to see them do the kicks again.
Credits:
Quick page by Michelle Coleman. I changed a few things around and made a second page from the one quick page.
Font: Ace Bingham and Bodie MF Holly
Wide Mouth Frog
I made this page in November, and I am just now putting it on my blog. The Wide Mouth Frog story is one of the things I remember from my childhood, and now that my dad has grandkids, he has a whole new audience. I had to scrapbook this story so that I can remember it forever.
Journaling reads:
Story: The wide mouth frog had her first babies and was unsure what to feed them. She decided to hop around the zoo and ask the other animals what they feed there babies. The giraffe tells her she feeds her babies leaves, the seal tells her she feeds her babies fish, and the bird tells her she feeds her babies worms. To each of these, the wide mouth frog says, "oh is that so?" speaking with her mouth wide open. She finally gets to the crocodile and says, "Hi, my name is wide mouth frog. What do you feed your babies?" The crocodile says, "I feed my babies wide mouth frogs." The frog replies with her mouth open very small, "oh is that so?"
Journaling block: My dad learned the story of the Wide Mouth Frog when he was in college. He has been telling it ever since. It's hard to explain the story; you really have to watch my dad tell it. He really gets into the actions of the frog talking with his wide mouth.
Credits:
Papers: Back To School CD - Digital Scrapbook Memories (DSM)
Tag Alpha (frog): Zoe's Merry-Go-Round, Playground CD - DSM
Scallop circle template: The Garden CD - DSM
Stiching: Riley's Sandbox, Playground CD - DSM
Buttons: Primary Buttons by Jessica Bolton
Stamp Alpha (wide): Hand Stamped Brushes by Michelle Coleman
Chipboard Letters (mouth): Black Currant Cameo font - made into chipboard with Atomic Cupcake Action.
Font: Cat Krap!
Picking Grapes
I made this one for the Stand Up and Scrap challenge, but I've change it up a little since then. It was made in September 2007.
Journaling Reads:
Jeff decided it was time to pick a few of Grandma and Papa’s grapes. 08-14-2007
Credits:
Papers and wordart: Stand Up and Scrap kit (Sweet Shoppe Designs)
Font: Pharmacy
Comfort
This page was also for the Stand Up and Scrap challenge, made October 2007.
Journaling reads:
You can always findcomfort in Grandma's arms. Shecan warm you when youare cold,console youif youare sad,welcome you to her home, wish you a good night, and show you how muchyou are loved. Grandma's hugs are a constant source of comfort.
Credits:
Papers and embellishments (some recolored): Obviously Orange kit and Ravishingly Red kit by Weeds and Wildflowers.
Saturday, January 26, 2008
Sweet Feet
I made this layout for the Stand Up and Scrap challenge, created in October 2007.
Credits:
Papers from It's My Party Kit by Dani Mogstad.
Jeff and Megan
Another ADSR challenge layout, made in July 2007. Journaling reads:
"I, who have no sisters or brothers, look with some degree of innocent envy on those who may be said to be born to friends." ~James Boswell
Once Apon a Time
Another one from the ADSR challenge, made in July 2007. Journaling reads:
Once upon a time there lived a beautiful princess named Megan.
Credits: Papers from PJs for Courage Kit from Elemental Scraps
Flower: Secret Shabby Chic Kit by Scrappy Pony Designs
Ribbon: Ity Bitty Ribbons Kit by Christina Renee
Alpha: PJs for Love from Elemental Scraps
Fonts: SF-Lea and Scriptina
The Liechty Reunion
I made this page for the ADSR challenge back in August 2007, but the original page was about my favorite part of the challenge (which was my great partner, Katie). I changed it up a little to print and put in my scrapbook.
Journaling reads:
We all went up to Grizzly Ridge for the Liechty Reunion and some 4-wheelin'.
Credits:
Backgroud paper, strips of paper, sticking, sun, and journaling strips: Summer Afternoon Kit by Bren Boone.
Crocheted strip (recolored): French Countryside Kit by Christina Renee
Date stamp: Memory Date Stamps 2 from Peppermint Creative
Got It From Mom
Another page for the ADSR challenge, made in August 2007. Journaling reads:
A few years ago I went to Staples and wondered around for over an hour. I looked at everything in the store, from notebooks and pencils to desks and office chairs. I bought a few things and went home. I showed my husband all the “cool” things I got at Staples and he looked at me like I was crazy. That’s when I started thinking I must be the only person in the world who LOVES office supplies. A couple of years later I moved home and discovered where I got this crazy obsession. My mother loves all the same things I do! I never consciously realized this before that time. Maybe it is hereditary or maybe I have grown up subconsciously learning this love of all office supplies, but I definitely got it from my mom.
Credits:
photo frames by Katie Pertiet
everything else from Welcoming Spring kit by Gina Huff
Goals
Here's another one from the ADSR challenge, made in August 2007. Journaling:
- top: My goal is to graduate college.
- bottom: my campus
Credits:
Alphas: Scrap Artist, Plain Digital Wrapper, Shabby Princess, Christina Renee, Scrapbook Bytes, Elemental Scraps, Peppermint Creative, Free Digital Scrapbook.com, and The Sweet Shoppe
Background paper: French Countryside Kit by Christina ReneeArrow stamp:
Arrow kit by Shawna Clingerman
Font: Terentino
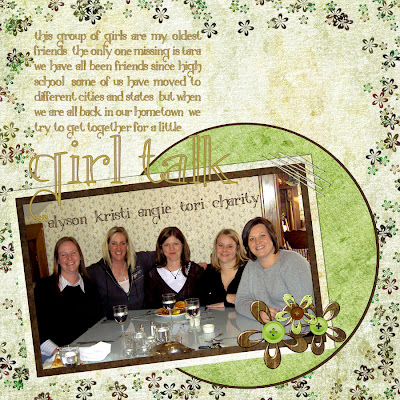
Girl Talk
This is another layout I made for the Amazing Digital Scrapbooking Race...made in August 2007.
Journaling Reads:
This group of girls are my oldest friends; the only one missing is Tara. We have all been friends since high school. Some of us have moved to different cities and states, but when we are all back in our hometown, we try to get together for a little Girl Talk.
Credits:
paper, overlay border, and flowers with buttons from Mint Chocolatta by Chere Edwards.
Stitches from Some Kind of Wonderful Kit by Sweet Shoppe Designs.
Font: Witchcraft
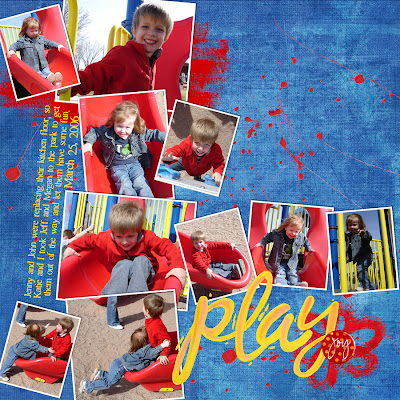
Play
Made this layout back in August 2007 as part of the Amazing Digital Scrapbooking Race (ADSR). Katie and I were partners for the race, and we made this layout together. I positioned all the pictures, and Katie embellished it for me. She even created the cool paint splatters from scratch.
Journaling:
Jenny and John were replacing their kitchen floor, soKatie and I took Jeff and Megan to the park to getthem out of the way and let them have some fun. March 25, 2006
Credits:
Paper, painted letters, painted flower, gel button, and paint smudge: Brilliantly Blue and Ravishingly Red Kits by Weeds & Wildflowers.
Paint splatters made by Katie (my partner)
Sunday, November 18, 2007
Forum Friends
 Journaling:
A group of girls from the Digital Scrapbook memories forums decided we should get together for lunch. We met at Zupas Cafe in Draper. We had a blast meeting for the first time and getting to know each other better.
Credits:
Template: Jen Caputo (Scrapbook Graphics)
Flowers: Playful Kit, Moods CD - Digital Scrapbook Memories (DSM)
All other papers and embellishments: Fiesta Kit, Moods CD - DSM
Fonts: School Bully and Margarosa
Pretzel
 Journaling:
You were having so much fun on the hammock in Grandma and Papa's backyard. I had to take a few pictures of the precarious positions you were getting yourself in. You were like a little pretzel with you feet above your head and your toes tangled in the ropes.
Credits:
Template: Jen Caputo (Scrapbook Graphics)
Papers and embellishments: Bubble-licious Kit (Sweet Shoppe)
Font: Girls are Weird
Font: Girls are Weird
Sunday, November 4, 2007
Tutorial - Folded Corner
This tutorial will show you how to achieve the look of a folded corner on a picture or piece of digital paper. Thanks to some awesome people on the Digital Scrapbook Memories forum for helping me figure this out. I used Photoshop CS2 for this tutorial, but I think the process is the same (or very similar) in Elements.
1. Select the polyagonal lasso tool (red circle below) to select a corner of your picture. Delete this corner of the picture. Keep this area selected until I tell you to deselect it or some of the steps won't work correctly. 2. Create a new layer and fill this layer with white (or whatever color you would like the back).
3. Go to Edit>Transform>Flip Vertical (or horizontal depending on the side you are folding).
4. Now use your move tool to rotate this piece to line up with the deleted portion of your picture (see picture below). 5. Now get your brush tool. Choose a round brush that has undefined edges (these are in the assorted brush set that comes with photoshop).
6. Create a new layer for your brush stroke.
7. Use a dark brown or grey color to paint a stripe along the outside edge of the fold. If you still have this area selected (marching ants around the fold) then the stroke will only appear on the fold (see photo below).
8. With the brush stroke layer selected, change the opacity and fill percentages until the brush stroke looks more like shading; you will find these options in the layers palette. A good example can be seen below. For this example I have opacity at 31% and fill at 43%.

9. To add a little more dimension to your shading, repeat steps 5-8. This time make your brush stroke further down on the outside edge of the fold. Make sure you have this stroke on its own layer so you can change the opacity to different percentages. This stroke you end up being a darker than the previous one. In my example, I have the opacity at 48% and fill at 76%.

10. Now you can deselect the layer by going to Layer>Deselect of pushing Ctrl + D.
11. Add a drop shadow to the original fold layer. I made my drop shadow with these amounts: Distance and size at 22 and spread at 30. You can adjust these to whatever looks right to you.
 12. The last step is to merge all the layers together. Go to Layer>Merge Visible. Now you can move your photo onto your layout.
If you want to save your photo with the fold, make sure to go to File>Save As and name it something different than the original.
Here's the final look! If you have any questions, feel free to ask and I will try to help you out. Good luck and happy scrapping!! 

Thursday, October 25, 2007
Jeff & Megan's Birthday Party
I took so many pictures at this event that I thought I better make a page of it as soon as possible. I still have more pics to scrap, so you may be seeing a few more pages from their party soon.
Journaling:
Jeff and Megan had their joint birthday party on Saturday, October13, 2007 at Independence Park. It was a lot of fun to watch them open their presents, interact with their friends, and have an overall great time.Credits:
Everything: It's my party kit by Dani Mogstad
Font: Angelina
Friday, October 19, 2007
New Cookbook Page
This is only the 2nd page I've made for the cookbook. Hopefully I will pick up the pace a little more, but probably not.
Credits:
Background paper: Moods CD, Sassy Kit - Digital Scrapbook Memories (DSM)
Paper for circles: Playground CD, Benjamin's Slide Kit - DSM
Tuesday, October 2, 2007
Halloween 2006
Just made this page. I made it really quick, so it's nothing spectacular, but sometimes I just need to do a page without too much fuss.
Journaling:
Katie came out to visit and we dressed up and went to Joseph and Tynelle's Halloween party. We played photo scavenger hunt and Body, Body. It was a really fun party and it was fun dressing up again.
Credits:
Background paper: Fall Kit, Seasons & Holidays CD - Digital Scrapbook Memories (DSM)
Photo & page borders: Extras kit, Collection 2 CD - DSM
Tag: Ribbon Kit, Collection 2 CD - DSM
Ghost and pumpkin: Halloween friends by Dani Mogstad
Font: Jot Medium - HMK
Saturday, September 1, 2007
Tutorial - Inked edges
This is something I discoverd how to do the other day, and I thought I would share it with everyone. I have Photoshop CS2, but I've been told this should work for elements as well. I'll also explain clipping masks, which is called 'group with previous' in elements. Here's a before and after picture of the effect.

 Steps:
1. Open a new document (any size) with a transparent background.
2. Create a type layer and type your text. It doesn't matter the color if you're going to cover it with paper.
 3. Open your chosen paper and drag it over the text layer. Make sure the paper layer is on top.
4. Select 'layer' then 'create clipping mask' (element's users: click 'layer' then 'group with previous'). At this point you can move the paper around, resize the paper, and see what looks best.
5. Once you have the paper the way you want it, select 'layer' then 'merge down'.
 6. Now find the layer in the layers palette (it should be the only one). Hold down the ctrl key and click on the thumbnail for the layer. This will put "marching ants" around the outside of the letters.
  7. Go to 'select', 'modify', and 'contract'. I like the very outsid edge to be darker, so I use 5 pixels in the 'contract selection' box. You can try different things at depending on what you want.
8. Now choose 'select' and 'feather'. Again, you can enter different pixels amounts depending on what you want. I usually use something between 5 and 25.
9. Go to 'select' and 'inverse'. Then create a new layer in the layers palette or go to 'layer', 'new', and 'layer'.
10. Select the brush tool and make sure the color is the one you want. You can use any color you want. Make the brush fairly big to make it a little easier to get all the edges.
11. Run the brush right across the letters (it should only show up in the area that is selected around the outside of the letters).
 12. Do step 7 two or three more times, except select 'expand' rather than 'contract' and select a slightly larger pixel amount (around 15 pixels). Do steps 7 through 11 two or three more times. Also, adjust the opacity and flow on the brush; lower it by about 20% each time.
13. Finally, do steps 4 through 5 again. Push ctrl+d to deselect the area. You can drag the whole thing onto any other page now using your move tool.
 This doesn't just work for letters. It also works for shapes and you can ink the edges of photos as well. I know there's a lot of steps, but after you've done it a couple of times it's actually fairly simple.
Friday, August 31, 2007
Jeffery Walker
 Credits:
Paper and embellishments: Benjamin's Slide, Playground CD - Digital Scrapbook Memories
Blue Stiching: Zoe's Merry-Go-Round, Playground CD - DSM
Fonts: Jot Medium and Ironman
Friday, August 24, 2007
Kisses
 Journaling:
Megan is such a sweetheart. Here she is giving me and her mom a sweet little kiss. Grandma was quick and caught these cute little moments on camera.
Credits:
All papers and embellishments are from the Dreamsicle Kit on Songbird Avenue.
Font: Tall Paul
Saturday, August 4, 2007
Flower Child
I made this layout for the Digi-dare. Here are the requirements:
You can only use one photo to represent your “first”.
Meaningful journaling about your “first”.
Use some Ric Rac on your page.
Use the word “First” somewhere on the page, but not in the title!
I'm also using this page for the Amazing Digi Scrapping Race Challenge #6.
 Journaling:
Megan is my first niece. She loves to fill up her watering can and water the flowers in Grandma and Papa's backyard.
Credits:
Font: PeroPaper: Gina Huff - Welcoming Spring Kit
Elements:
1 & 2 - Split frame and layered flower with button by Miss Mint - Foxy Lady Kit
3 & 4 - Spiral ribbon and brown button by Baers Garten Designs - Agata Kit
5 - RicRac flower by Wendyzine Scraps - Thrift Store Donations Kit
6 & 7 - Twisted ribbon and clipped flower by Digiscrap.ch - The Vert Kit
8 - Polka dot border by Karin McCombes - Visions of Sugar Plums Kit
9 - Polka dot flower by T. Brady - Visions of Sugar Plums Kit
10 - Purple button by H Mccaig - Fall Bronzer kit
11 - Staples by Eva Racinella - Fresh Delishts Kit
12 - Stiching by Paula Duncan - Some Kind of Wonderful Kit
13 & 14 - "flower" letters and pin by Shabby Princess - Eclectic Collage Kit
15 - flower doodle by Digital Scrapbook Memories - Moods CD, Dreamy Kit
Tuesday, July 17, 2007
News Anchors
 Journaling:
At the Mall in Layton there’s a play area with this miniature news desk. It took me forever to get a picture with Jeff and Megan sitting at the desk together, but I finally got it. Maybe one day one of them will be a news anchor. 4-27-2007
Credits:
Papers, heart, cardboard, and staples: Urban Color Kit by Michelle Coleman
Aged/dingy frame: Jackie Eckles
Gel dot and flower ribbon: Mellow Kit, Moods CD - Digital Scrapbook Memories
Gel dot and flower ribbon: Mellow Kit, Moods CD - Digital Scrapbook Memories
View From the Top
 Journaling:
Dad, Jenny, the kids, and I went searching for a geocache in the hills about Vernal. We never did find the cache, but we did enjoy the view.
Credits:
Paper, stamps, and elements: Techno Grunge by Shawna Clingerman
Wednesday, July 11, 2007
Little Miss Curious

Journaling:
Megan loves that stool. She drags it everywhere. Often it is used to sit up at the table or to help grandma in the kitchen, but it is also used to find some interesting things on the high shelves in Papa’s study.
Credits:
Papers and brackets: Capricious Kit by Shawna Clingerman
Distressed paint frame: Digital Distressing Kit by Scrap Artist
Fonts: Witchcraft and Marydale
Subscribe to:
Posts (Atom)