Sunday, November 18, 2007
Forum Friends
Pretzel
Font: Girls are Weird
Sunday, November 4, 2007
Tutorial - Folded Corner
This tutorial will show you how to achieve the look of a folded corner on a picture or piece of digital paper. Thanks to some awesome people on the Digital Scrapbook Memories forum for helping me figure this out. I used Photoshop CS2 for this tutorial, but I think the process is the same (or very similar) in Elements.
1. Select the polyagonal lasso tool (red circle below) to select a corner of your picture. Delete this corner of the picture. Keep this area selected until I tell you to deselect it or some of the steps won't work correctly. 2. Create a new layer and fill this layer with white (or whatever color you would like the back).
3. Go to Edit>Transform>Flip Vertical (or horizontal depending on the side you are folding).
4. Now use your move tool to rotate this piece to line up with the deleted portion of your picture (see picture below). 5. Now get your brush tool. Choose a round brush that has undefined edges (these are in the assorted brush set that comes with photoshop).
6. Create a new layer for your brush stroke.
7. Use a dark brown or grey color to paint a stripe along the outside edge of the fold. If you still have this area selected (marching ants around the fold) then the stroke will only appear on the fold (see photo below).


 12. The last step is to merge all the layers together. Go to Layer>Merge Visible. Now you can move your photo onto your layout.
Thursday, October 25, 2007
Jeff & Megan's Birthday Party
I took so many pictures at this event that I thought I better make a page of it as soon as possible. I still have more pics to scrap, so you may be seeing a few more pages from their party soon.
Credits:
Everything: It's my party kit by Dani Mogstad
Font: Angelina
Friday, October 19, 2007
New Cookbook Page
This is only the 2nd page I've made for the cookbook. Hopefully I will pick up the pace a little more, but probably not.
Tuesday, October 2, 2007
Halloween 2006
Just made this page. I made it really quick, so it's nothing spectacular, but sometimes I just need to do a page without too much fuss.
Saturday, September 1, 2007
Tutorial - Inked edges
This is something I discoverd how to do the other day, and I thought I would share it with everyone. I have Photoshop CS2, but I've been told this should work for elements as well. I'll also explain clipping masks, which is called 'group with previous' in elements. Here's a before and after picture of the effect.

 Steps:
1. Open a new document (any size) with a transparent background.
2. Create a type layer and type your text. It doesn't matter the color if you're going to cover it with paper.
 3. Open your chosen paper and drag it over the text layer. Make sure the paper layer is on top.
4. Select 'layer' then 'create clipping mask' (element's users: click 'layer' then 'group with previous'). At this point you can move the paper around, resize the paper, and see what looks best.
5. Once you have the paper the way you want it, select 'layer' then 'merge down'.
 6. Now find the layer in the layers palette (it should be the only one). Hold down the ctrl key and click on the thumbnail for the layer. This will put "marching ants" around the outside of the letters.
  7. Go to 'select', 'modify', and 'contract'. I like the very outsid edge to be darker, so I use 5 pixels in the 'contract selection' box. You can try different things at depending on what you want.
8. Now choose 'select' and 'feather'. Again, you can enter different pixels amounts depending on what you want. I usually use something between 5 and 25.
9. Go to 'select' and 'inverse'. Then create a new layer in the layers palette or go to 'layer', 'new', and 'layer'.
10. Select the brush tool and make sure the color is the one you want. You can use any color you want. Make the brush fairly big to make it a little easier to get all the edges.
11. Run the brush right across the letters (it should only show up in the area that is selected around the outside of the letters).
 12. Do step 7 two or three more times, except select 'expand' rather than 'contract' and select a slightly larger pixel amount (around 15 pixels). Do steps 7 through 11 two or three more times. Also, adjust the opacity and flow on the brush; lower it by about 20% each time.
13. Finally, do steps 4 through 5 again. Push ctrl+d to deselect the area. You can drag the whole thing onto any other page now using your move tool.
 This doesn't just work for letters. It also works for shapes and you can ink the edges of photos as well. I know there's a lot of steps, but after you've done it a couple of times it's actually fairly simple.
Friday, August 31, 2007
Jeffery Walker
 Credits:
Paper and embellishments: Benjamin's Slide, Playground CD - Digital Scrapbook Memories
Blue Stiching: Zoe's Merry-Go-Round, Playground CD - DSM
Fonts: Jot Medium and Ironman
Friday, August 24, 2007
Saturday, August 4, 2007
Flower Child
I made this layout for the Digi-dare. Here are the requirements:
You can only use one photo to represent your “first”.
Meaningful journaling about your “first”.
Use some Ric Rac on your page.
Use the word “First” somewhere on the page, but not in the title!
I'm also using this page for the Amazing Digi Scrapping Race Challenge #6.
 Journaling:
Megan is my first niece. She loves to fill up her watering can and water the flowers in Grandma and Papa's backyard.
Credits:
Font: PeroPaper: Gina Huff - Welcoming Spring Kit
Elements:
1 & 2 - Split frame and layered flower with button by Miss Mint - Foxy Lady Kit
3 & 4 - Spiral ribbon and brown button by Baers Garten Designs - Agata Kit
5 - RicRac flower by Wendyzine Scraps - Thrift Store Donations Kit
6 & 7 - Twisted ribbon and clipped flower by Digiscrap.ch - The Vert Kit
8 - Polka dot border by Karin McCombes - Visions of Sugar Plums Kit
9 - Polka dot flower by T. Brady - Visions of Sugar Plums Kit
10 - Purple button by H Mccaig - Fall Bronzer kit
11 - Staples by Eva Racinella - Fresh Delishts Kit
12 - Stiching by Paula Duncan - Some Kind of Wonderful Kit
13 & 14 - "flower" letters and pin by Shabby Princess - Eclectic Collage Kit
15 - flower doodle by Digital Scrapbook Memories - Moods CD, Dreamy Kit
Tuesday, July 17, 2007
News Anchors
 Journaling:
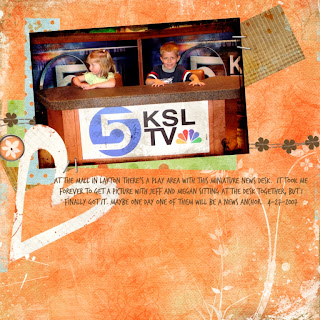
At the Mall in Layton there’s a play area with this miniature news desk. It took me forever to get a picture with Jeff and Megan sitting at the desk together, but I finally got it. Maybe one day one of them will be a news anchor. 4-27-2007
Credits:
Papers, heart, cardboard, and staples: Urban Color Kit by Michelle Coleman
Gel dot and flower ribbon: Mellow Kit, Moods CD - Digital Scrapbook Memories
View From the Top
 Journaling:
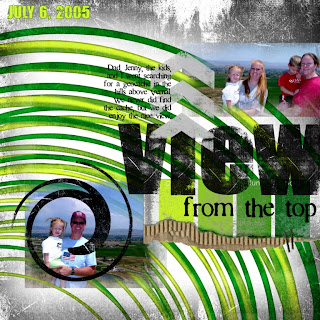
Dad, Jenny, the kids, and I went searching for a geocache in the hills about Vernal. We never did find the cache, but we did enjoy the view.
Credits:
Paper, stamps, and elements: Techno Grunge by Shawna Clingerman
Wednesday, July 11, 2007
Little Miss Curious

Journaling:
Megan loves that stool. She drags it everywhere. Often it is used to sit up at the table or to help grandma in the kitchen, but it is also used to find some interesting things on the high shelves in Papa’s study.
Credits:
Papers and brackets: Capricious Kit by Shawna Clingerman
Distressed paint frame: Digital Distressing Kit by Scrap Artist
Fonts: Witchcraft and Marydale
Monday, June 11, 2007
The Greatest Gift of All
 Journaling:
Spending Christmas with family is definitely the greatest gift of all!
Credits:
Papers and embellishments: Jolly Holidaze by Melissa Bennett
Font: Mcgannahan
Inspiration: scraplifted a Becky's Sketch layout by Jordan Stone
Sunday, June 3, 2007
Papa Reading
 Journaling:
Papa is another name for love.
Credits:
Papers and embellishments: Mud Tracks by Melissa Bennett
Font: Yataghan
Wednesday, May 30, 2007
10 Dozen Hard-Boiled Eggs
 Journaling:
With only 2 children, you would think we wouldn't need so many eggs, but not this year. everyone wanted to dye eggs, so we boiled about 10 dozen and pulled out all the stops. we didn't stop at dye, we also had markers, stickers, tape, and extra vinegar (for extra bright colors).
Credits:
Papers and embellishments: Megan's Swingset, Playground CD - Digital Scrapbook Memories
Font: Ace Bingham SH, Tuesday, and the bends
Rachel & Dan's Reception
 Journaling:
Jenny, Jeff, Megan, Katie, and I all went to the reception in Provo. It was great seeing and visiting with family and sharing in Rachel and Dans special day.
Credits:
Papers and embellishments: PJs for Charity from Elemental Scraps
Fonts: Suzanne Quill
Friday, March 23, 2007
Christmas Morning 2006

Journaling:
The first thing we do on Christmas morning is go to Jenny and john's to see the kids wake up and discover Santa has been to their house. There's nothing better than seeing the excited looks on their faces and watch the joy they express for each new thing they see.
Credits:
Papers and embellishments: Jolly Holidaze by Melissa Bennett
Fonts: Chachie and ExxPresleySH
Antelope Island
 Journaling:
Mom, Dad, and Katie came to visit me in Layton. During their visit we went out to Antelope Island. Katie elected to stay at my apartment and sleep in. I had no idea the island was as big as it is. We came across a few painted buffalo that we had to stop and take pictures of. Back in 2002, the Wasatch Front was covered with these buffalo, and we drove all over Salt Lake getting pictures taken with them. Our goal was to see them all, but we didn’t have time. It was fun to remember those buffalo and add a few more buffalo to our list. I think the buffalo to the left wasn’t part of the original “Utah Buffalo Roundup”, but it’s close enough, so we still got a picture of it. “The Hand of Man Buffalo” signifies the buffalo’s role in providing for men. The red handprints signify the buffalos near extinction, and three turquoise handprints signify the hand of man in bringing back the buffalo.
Credits:
Papers and grass border: Wild Kit, Moods CD - Digital Scrapbook Memories
Fonts: Junebug and CAC One Seventy
Thursday, March 22, 2007
Family BBQ

Journaling:
John, Wendy, Melissa, and Courtney Manwaring came out from Ohio to take Melissa to school. She is attending BYU for her first semester this year. The Manwarings storpped in Vernal for a few days to visit the Weber side of the family. Many other family members also traveled from around Utah for the visit. We had a big bar-b-que during the visit, and everyone had a great time catching up.
Credits:
Papers and embellishments: Power to the Flower Kit by Samara Gugler
Font: Bambino
Wednesday, March 21, 2007
Bridal Veil Falls

Journaling:
We left early on the 5th so Sarah could go to class. After her class we drove down Provo Canyon to Bridal Veil Falls. It has been years since I visited the falls and it was a lot of fun to explore the area again.
Credits:
Tags, brads, and flower: Popsicle Toes Kit by Scrap Artist
Border (used to erase part of picture): Collection Two, Extras Kit - Digital Scrapbook Memories
Font: SF Karens
Wednesday, February 28, 2007
New Guitar
 Journaling:
Katie: give me a hint!
Jenny: It’s pink.
Katie: give me another hint
Katie: Do you know what it is?Aly: YesKristi: YesMom: YesKatie: Ewww!!!
Jenny: You walked right passed it.
Katie: WHERE!!!
Jenny pulls out a guitar case with a pink scarf bow.
Katie: A GUITAR!!!
Credits:
Papers and embellishments: Melissa Bennett’s Jolly Holidaze Kit
Paint Stripes: Digital Distressing Kit - Scrap Artist
Font: Cool
Tuesday, February 27, 2007
New Year's Eve 2006
 Journaling:
On New Years Eve 2006 the youngest kids were so quiet and good. They sat in corners, on the couch, and on the floor playing and comparing each other’s games.It was cute how they were always sitting in a little group, each playing their own game.
Credits:
Papers: Mini Moose Kit by Christy Lyle
Monday, February 26, 2007
Sunday, February 25, 2007
Memorial Day
 Journaling:
A three year old child is a being who gets almost as much fun out of a fifty-six dollar set of swings as it does out of finding a small green worm. Bill Vaughan
We spent Memorial Day 2006 at Ryan & Julie’s house. Megan spent almost the entire time on the swingset and even convince Aunt Aly to join her and Grandma to push.
Credits:
Background paper and chain embellishments: PJs for Courage - Elemental Scraps
Paint stamps: Digital Distressing Kit - Scrap Artist
Techniques: Used four different papers for the background and changed the blending modes.
Font: Bambino
Monday, February 5, 2007
Sack of Potatoes
 Journaling:
This was Jeff’s first year playing soccer. His favorite thing about soccer was having Papa as his coach. After the game they would always play around. Jeff would squeal with delight as Papa threw him over his shoulder like a “sack of potatoes”.
Credits:
Papers: scrapartist.com Popsicle Toes Kit
Distressing: scrapartisit.com Digital Distressing kit and Aged Overlays Kit
“Laugh” embellishment: scrapartist.com Popsicle Toes Kit
Word strips embellishment: plaindigitalwrapper.com August Bliss Kit
Techniques: Adjusted the hue on all papers and embellishments
Fonts: Journaling – Freebooter, Title – Bambino, Copperplate Gothic Lite, and Bluecake.
Inspiration: Jessica Sprague's block trick, creatingkeepsakes.com
Saturday, February 3, 2007
One More
 Journaling:
Grandma told Jeff he still had one present under the tree and off he went on a MISSION to find it.
Credits:
Papers and tree embellishment: Seasonal Sampler; theshabbyshoppe.com
Snowflake embellishments: Tropical Winter; theshabbyshoppe.com
Picture and photoblock borders: Collection Two, Extras - Digital Scrapbook Memories
Fonts: Title – Frosty; Journaling – Kirby
Inspiration: Grid Trick by Jessica Sprague; Creatingkeepsakes.com
Friday, February 2, 2007
Progressive Dinner

Journaling:
One of our familiy’s newer traditions is a progressive dinner. We caravan to each house to eat one course of a meal and see everyone’s Christmas decorations. In 2006 we had the progressive dinner on the 23rd of December, which allowed some of the out-of-town family to join in.
Ryan & Julie’s - Salad
Shaneen’s - Visit
Grandma’s - Main Course
Kristi & Ronnie’s - Visit
Jen & John’s - Visit
Cheya & Myke’s - Dessert
Credits:
Christmas Office Party Kit from plaindigitalwrapper.com: background and embellishments.
Font: Kirby
Sunday, January 28, 2007
Sidewalk Chalk
 Journaling:
Kristi, Ronnie, and Jeff had a good time drawing on the back patio with sidewalk chalk.
Credits:
Background paper and ribbon: May 2005 FreePea from twopeasinabucket.com
Tags: Vacation Holiday FreePea
Stiching: Shabby Stiches from theshabbyshoppe.com
Font: Chalk


